- Sanskrit (Original): –
- Etymology: –
- Fun Fact about the pose: A pose as fierce as a dragon. Mastering it will make you feel (almost) almighty.
- Asana Type: Balancing, Standing
- Main length muscle groups: muscles_length_muscle_groups
- Main strength muscle groups: Hamstrings, quadriceps, adductors, glutes, hip flexors, core muscles; standing leg: articularis genu, gastrocnemius, tibialis muscles, muscles of the foot
- Vinyasa Breath: Exhale
How to Cue the Pose: Step By Step
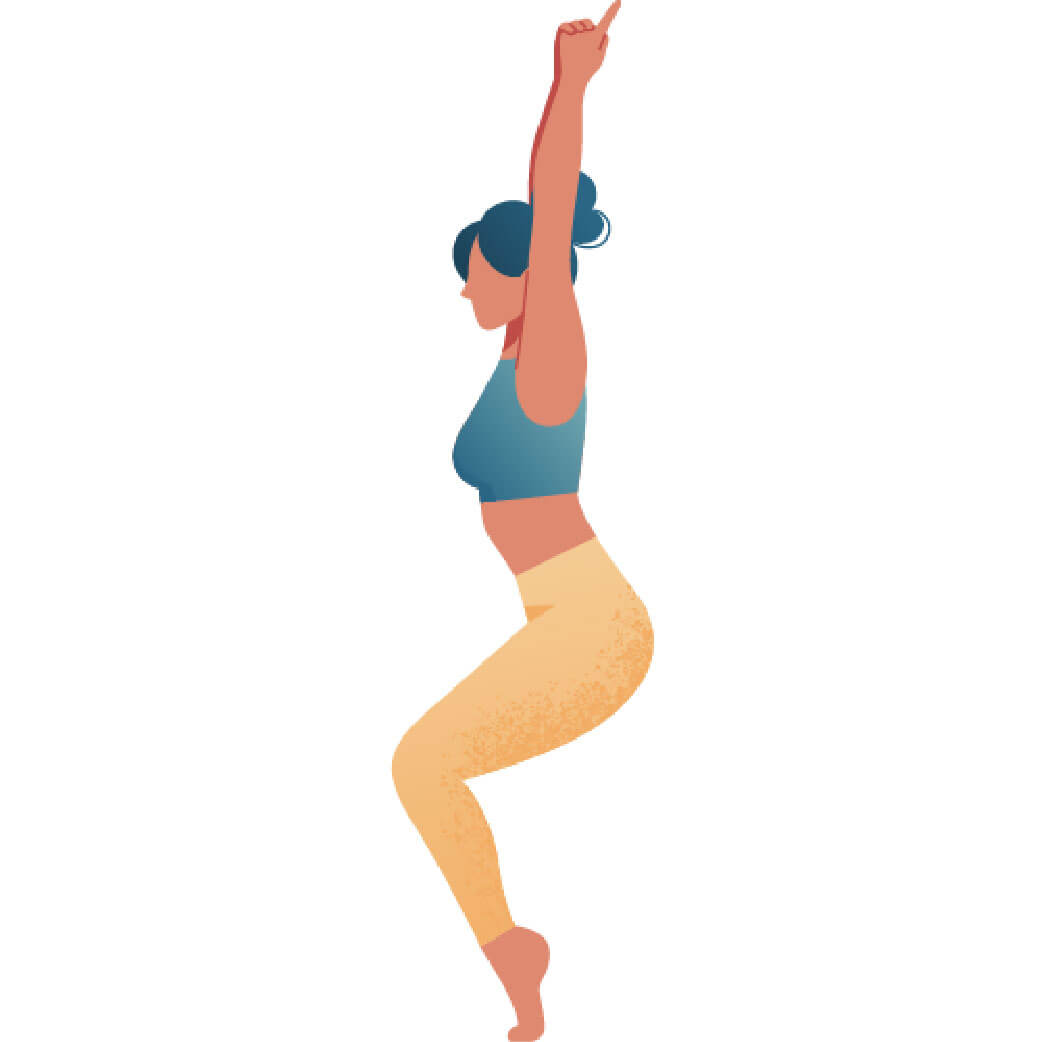
- 1 Start in a standing position and shift your weight into one foot.
- 2 Find a focus point for your gaze to rest and then lift your other knee and start to bend the standing leg.
- 3 Cross the lifted knee behind the standing-leg knee and pull the foot across.
- 4 Send your groins deeper into your body by moving your hips backwards.
- 5 Extend your arms fully and stretch them to the opposing side of the lifted heel. Your arms are now functioning as a counterbalance to the lifted leg.
- 6 Engage your core muscles and center your legs. Start to bend your standing leg more and more.
- 7 Slowly move the lifted knee down the back of your lower standing leg until it comes into contact with the outer ankle of the standing leg.
- 8 Exit Dragon Pose on an inhale to either come up into Tadasana or transition more dynamically into Ardha Chandrasana or Flying Warrior Pose.
Working The Details: Alignment In The Pose
- Hug the midline: Imagine yourself curling into a really compact and small ball. The more stability you can find in your core, the deeper and more stable you will be able to get into the pose. Pull your navel up and back to the spine and imagine all your muscles hugging around an invisible line running through the center of your body.
- Center the legs: Press your legs together as if you were squeezing a block inwards and up. This will activate the energy in your pelvic floor muscles, which is a vital part of your core muscles.
- Ground into your foundation: Activate all points of the foot, paying special attention to push the big toe mount and small toe mount into the mat. Imagine your foot being glued down to the floor, including the heel. From this stability in the foot, you can safely explore the range of motion in your ankle joint, which also determines how deep you will be able to sink with your lifted knee.
- Counterbalance your arms and leg: Finetune the small dance happening between engaging everything in towards your midline and extending the arms and the lifted lower leg outwards and away from each other. You can play between these two actions by alternately focussing more on the one and then on the other. The next step is to do both actions simultaneously.
- Keep the lifted foot engaged: As this pose needs a lot of attention in many places of the body, it is not unusual for practitioners to neglect the lifted foot as it seems to be the place with the least issues. However, the engagement of the lifted foot helps you to maintain your balance, centering and counterbalance action. So be sure to keep the foot engaged by pressing the big toe mount away from you – even if your attention is caught up in at least four different other areas of your body.
Adapting The Pose Through Modifications
Simplify
- If the mobility in your ankle joint is limited or your achilles tendon really tight, you can help yourself by placing a rolled-up towel underneath your heel and experiment in the pose from here. The slight elevation will already pre-bend your ankle, which makes it easier for you to find more range of motion. Beware, however, that this will also make your position less stable so that you need more core activation to balance.
- Minimize the crossing of the lifted knee and foot if your outer hips are starting to cramp. You can work on lowering down in the pose with the lifted knee going down towards the back of the standing ankle, rather than to the outside. You will have less strain on the outer hips and legs, while improving the strength of your quadriceps and the range of motion of your ankle joint.
- If balance is a real struggle for you, use a chair or something similar to hold on to in Dragon Squat. Instead of extending your arms to counterbalance, you take hold of the chair with them. This way, you can focus on bending the knee, activating the core and centering the leg. Once you’ve mastered these actions, you can eventually let go of the chair or leave it there “just in case”.
Level Up
- If you are looking for a new challenge in Dragon Squat Pose, try it with your standing leg on tiptoes. You will immensely challenge your balance and fire up your calf muscles.
- Make the pose dynamic and practice repeating transitions between Flying Warrior Pose and lowering down into Dragon Squat. You can even play with the tempo in which you are transitioning and see how accurately you can do the pose at a faster pace or at a slower pace.
- Close your eyes while finding your way down into the pose. Apart from challenging your balance, this will engage your proprioception, which tells all your body parts where they are in space. Get into the full pose with closed eyes and then open the eyes and check your alignment visually.
Benefits of Dragon Squat
- Dragon Squat Pose is great to strengthen almost all the muscles in your body. It is great for the feet, leg and hip muscles. It strengthens your core and activates your hamstrings.
- The pose is perfect for toning the abdominal muscles, as the core activation and centering of the legs also add a little lift to the pelvic floor. The slight twist resulting from counterbalancing the lifted leg and the arms adds to this effect.
- Dragon Squat is excellent to increase stability and strength in your ankle joints, especially if you are prone to injuries due to overstretched ankle ligaments, this pose – practiced sensibly – can help you to rebuild and strengthen the supporting muscles.
- An increased range of motion in the ankle joint can be achieved through the practice of Dragon Squat, as the weight-bearing on the ankle gently opens up the joint.
- As Dragon Squat is a very challenging pose for most practitioners, it helps to build resilience, stamina, and open the mind. Once the practitioner is able to fully engage in the pose, the underlying inner resistance can be overcome.
Pose Variations
See all PosesPose variations can be anything that makes the original pose easier or more simple but also anything making it more challenging or adding complexity.
-
Dragon Squat on Tiptoes
-
Dragon Squat on Rolled-Up Towel
Preparatory Pose
See all PosesPreparatory poses are poses that have a similar shape to the pose you want to prepare for but maybe in a different alignment towards gravity and/or poses that target specific body areas to warm up, stretch or strengthen in order to lead to the final pose. Include preparatory poses when you build yoga sequences.
-
Garudasana
Eagle Pose
Counter Pose
See all PosesCounter poses serve to balance the body back into neutral after a pose or a set of same poses. E.g. symmetrical poses balancing asymmetrical poses, forward folds or twists balancing backbends, balancing challenging poses with restorative poses. Use counter poses to build sequences that feel amazing – you can use our free Sequence Builder tool to get started.
-
Baddha Konasana
Butterfly Pose
I encountered Dragon Squat for the first time in Inside Yoga. The full pose is quite challenging for me, but its benefits are beautiful once I accept the challenges of the pose.
Saskia
Content Manager at Inside | Passionate Yoga Teacher
FAQ: Common questions about this pose
As the name suggests, Dragon Squat is part of the squat family, just a more challenging variation of it. In the full pose you are basically sitting in a full squat with one leg, so your knee is nearly completely flexed. However, if you have a knee injury or just not (yet) enough range of motion in your ankle, you can also practice the pose with less flexion in the standing knee.
In the full pose there is almost a ninety degree angle between your standing leg and the bent lower leg. Your lifted lower leg is turned out so that it is parallel to the front end of your mat. You can extend your foot out as far as you can, as long as the lifted knee stays in contact with the standing leg/ankle. Be sure to counterbalance this extension with your arms. If this is not accessible to you, you can also practice the pose with the lifted lower leg turning out less. This way your lifted foot will also stay closer to your body.
Maintaining the body weight in a balance is one of the challenges of Dragon Squat. As you bend your knee deeper on your way down, you should focus on sending your hips back, so that they are preventing you from falling forward. So here your weight is slightly more on your heels. Once you have found your deepest point in the pose you pay attention to bring more weight into your forefoot and toes, as this will affect the angle in your ankle and allow you to move even deeper into the pose.